As sports science continues to grow, the importance of strength development in all positions has become a bigger part of the training process. Gone are the days where Quarterbacks don’t lift because they think it will mess with their throwing motion. The reality is that by developing strength in all parts of your body you will not only become a better passer, but also a better overall athlete.
We will focus on a few lifts that will supplement your current weight lifting plan. These are not designed to be done on their own, instead they should be added to the work you do in the weight room with your team. It’s important that you talk to the strength and conditioning coach to ensure that you are pairing these exercises correctly and not overtraining.
Shoulder Exercise
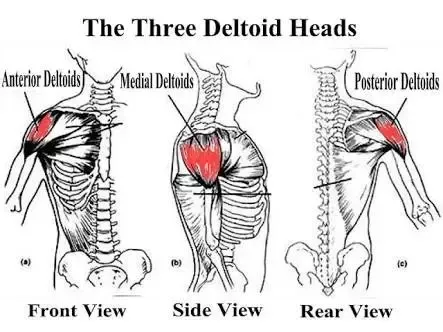
One of the hardest parts about training the shoulders is that there are so many different muscles involved in the human shoulder. The deltoid muscle (the major muscle of the shoulder which most people notice) has three different heads – the anterior, medial and posterior. While most shoulder movements activate all parts of the muscle, they do so in different levels.
In order to fully train the shoulder muscles we use the Boulder Train. This is a series of lifts done back to back with a light weight (normally in the 5-15 pound range). We will do each lift for 12 reps and by the end, regardless of the weight, each head of the deltoid will get the work it needs to grow.
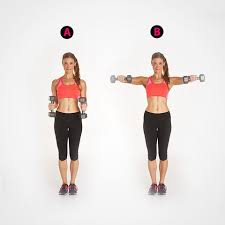
The first exercise in the series is the Angled Lat Raise. For this you will stand in an athletic position and raise both arms (with elbows locked out) at a 45 degree angle. During this lift we talk a lot about keeping the upper body stable and only having one joint of movement (the shoulder). The tempo should be slow and controlled so that the deltoid is the muscle that is doing all of the work.
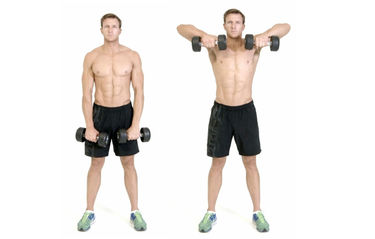
Immediately after you complete 12 reps of the Lat Raise you will move to the Upright Row. Again you will be in an athletic stance with your hands hanging directly in front of you with your weights. To execute the lift you will bring your elbows straight to the ceiling while keeping your palms facing in towards your chest. We focus on the core staying tight and keeping the shoulder as the sole point of movement, although in this lift the elbows and wrists will also bend. As a general rule we want our players to raise the weights up past their nipples, but the biggest thing is that they are keeping the plane of movement consistent.
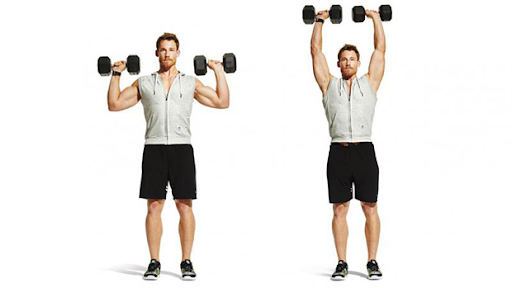
The final exercise, which is done immediately after the 12th rep of the Upright Row, is the Shoulder Press. Again the athlete needs to be in a strong athletic position and is going to press the weights from just above his shoulders to above his head. Because the different heads of the deltoid have been exhausted from the previous lifts, the work of the light weight will be focused on the anterior deltoid.
This is a great series of lifts to quickly get all angles of the deltoid developed.
Bulgarian Split Squat
When it comes to weight lifting there are countless varieties of different lifts. As research continues to grow and the ability to share it gets easier, you see a host of different versions of lifts. The majority of these unique lifts have a purpose, but they aren’t very specialized and aren’t designed for a high school athlete that is looking to develop overall strength.
The Bulgarian Split Squat is one of the few unique lifts that is almost perfectly designed for a high school athlete. The back squat still remains an essential lift movement, but because of the single leg nature of the Bulgarian Split Squat, it provides exceptional benefits for high school athletes.
The first thing that it does is to force each leg to operate on its own. This helps the body correct minor discrepancies that the back squat is able to hide. The next thing that it does is work on the core and balance. Because The Bulgarian Split Squats a single leg exercise where the athlete is holding the weights in their hands, the core must be engaged and the athlete has to maintain balance throughout the movement. These aspects are both useful in the athletic world. The last thing this lift does is loosen up the hips by providing a great stretch for the hip flexor. The modern high school athlete is not very flexible. It is important that they work on this range of motion as it will improve their athleticism across the board.
A key reason why we like the Bulgarian Split Squat is that it takes very little time to master and a beginner can easily pick up the nuances of the lift and start improving their strength right away. This is a critical component of any auxiliary exercise you are going to implement – if you have to spend several sessions developing the correct form, then those are not sessions where strength is improving.
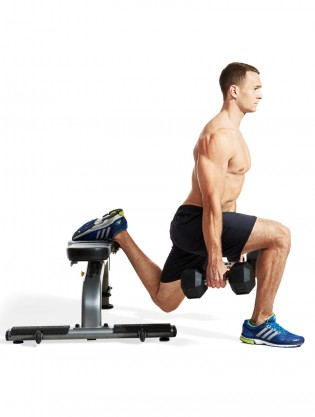
Executing the Bulgarian Split Squat is pretty straight forward. The athlete will hold the weight in their hands while standing in front of a bench. Next they will raise a leg up and put it on the bench so that their laces are resting on the pad of the bench. From here they will want to scoot out their base leg (the one not on the bench) so that when they squat down their shin is around 90 degrees to the bench. To start the lift the athlete will drop their hips down to the point where their base leg reaches a 90 degree bend. That is one rep. We normally do somewhere in the ballpark of 6-10 reps on each leg.
While this is a pretty simple lift, there are a few common errors that you will see. The first is that athletes will collapse their chests and bend their backs. We want our players to keep their chest upright so we will use the phrase “shoulders back” to help correct this. The other major issue is that athletes will not be able to bend all the way down. This is a product of their hip flexibility, which is a key component in being a fluid athlete on any field. To correct this we will have them use less weight and really focus on getting the correct depth to stretch the hip flexor.
Core Exercise
As a Quarterback it is incredibly important to have a strong core. Your core comes into play during your time scrambling, staying on your feet as opponents are clawing at you, as well as when you go to generate strength to make a pass. In these scenarios, along with endless other times during a game, you will call on your core to help you perform at a high level.
Training the Core can be a difficult process. The majority of people rely on some sort of plank variation. While planks can be an effective tool, it’s important to add some variety to the different ways that you engage and train your core. We make a habit of trying to engage our core in a variety of our auxiliary lifts by using single leg/arm variations or adding an unstable surface.
While it’s important to engage the core through your auxiliary lifts, it is also still vital to have specific lifts that focus on the core. For this we use our Towel Slides. These allow us to work our core in a very time efficient manner.
These towel slides are similar to planks. The major difference comes down to how long it takes to execute them. While planks normally require the athlete to hold them for multiple minutes, we can normally get through a full set of our towel slides in under a minute. This allows us to effectively hit our core without spending too long on it.
Towel slides are also a great exercise because they require very little in terms of equipment. All that we need are two pieces of towel (about 12 inches by 12 inches) per person and a non carpeted surface. For the series we will start with our players on their elbows with both feet on the towel. From here we will do 12 reps of bringing both knees up to the chest (while keeping the toes on the ground), 12 reps of alternating knees up to our chest (similar to mountain climbers) and then 12 reps going side-to-side while keeping our legs straight.
If we are looking to work our hamstrings and lower back, we will then flip over and have them place their back on the floor with the soles of their shoes on the towels. They then lift up their hips and bring their heels to their butts. The key on this one is that they are slow and move under control. We have found that this is one of the most effective ways to engage the hamstring while also ensuring we get some core work in.
You can easily change up the order but we have found this to be a pretty good routine for our players. As they progress through it and get better, we will have them shift from their elbows to their hands. This is a simple way to add difficulty and let each player tailor the lift to their strength level.
Stretch Activity
With the amount of throwing and shoulder work that the average quarterback does, it’s no wonder that a lot of times they experience sore shoulders or unnatural movement, especially as they get older. One simple exercise that we have started to do that helps limit this is our Scap Wall Slides.
Scap Wall Slides are designed to help balance the small muscles throughout the shoulder and ensure that the joint can move effectively through a full range of motion. This is a great tool for all players, but especially for Quarterbacks because of the constant stress that is put on their shoulders.
Again, this is a very simple movement that can have huge long term positive effects on your shoulders. To execute the move simply stand with hips and back against a wall. From here raise your arms at a 90 degree angle (tricep parallel to the floor) with the back of your hands against the wall. Simply slide both hands up while keeping your full arm against the wall. Once your have reached the top of the movement, slide them back down in a controlled. We do 5 reps of this exercise in between sets.
This is a quick and simple exercise, but it’s incredibly effective at letting the body balance out some of the internal issues and imbalances that develop over the course of a season.